Write and publish a document
Write SOPs, handbooks and guides in the document editor, organise them into sections, publish them to your community site, and bring back an older version.
Documents is where your community keeps its SOPs, policies, handbooks and guides. You write them in the control panel, choose who can read each one, and publish them to the Documents page on your community site. Members always read the latest published version, so there are no more old copies or broken links.
This article covers writing a document, publishing it, organising documents into sections, and bringing back an earlier version.
Before you start#
- Install the Documents module. See Add or remove modules for your community.
- You need the Write and edit documents permission. If it's limited to a department, you only see and edit that department's documents.
Create a document#
-
In the left sidebar, under Documents, click Documents. The editor opens full screen, with your documents listed on the left.
-
Click New document at the bottom of the list.
-
Type a title over Untitled at the top.
-
To give it an icon, click Add icon above the title and pick an emoji.
-
Start writing underneath.
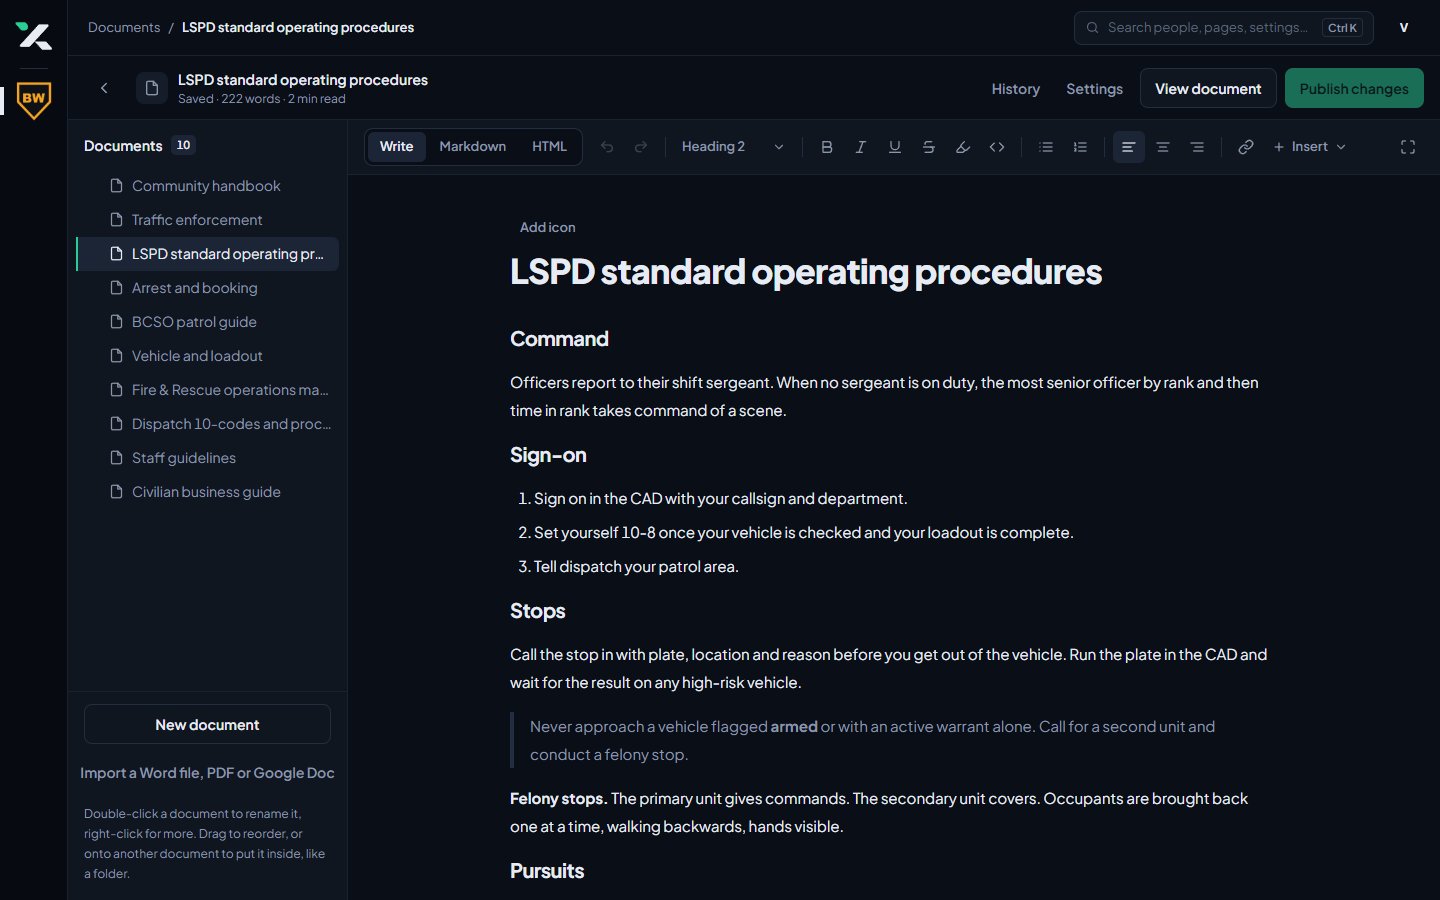
Your work saves by itself as you go. The line under the title at the top of the screen shows Saving…, Saved or Unsaved changes, with a word count and reading time.
A new document is a draft. The banner above it says This document isn't published. Only people who manage documents see it.
Write and format#
The toolbar above the page has:
- Undo and Redo
- a text style menu: Paragraph, Heading 1, Heading 2, Heading 3, Quote and Code block
- Bold, Italic, Underline, Strikethrough, Highlight and Inline code
- Bulleted list and Numbered list
- Align left, Align centre and Align right
- Link
- Insert, with Table, Image from a link, Upload image, Divider, Note, Tip, Warning and Collapsible section
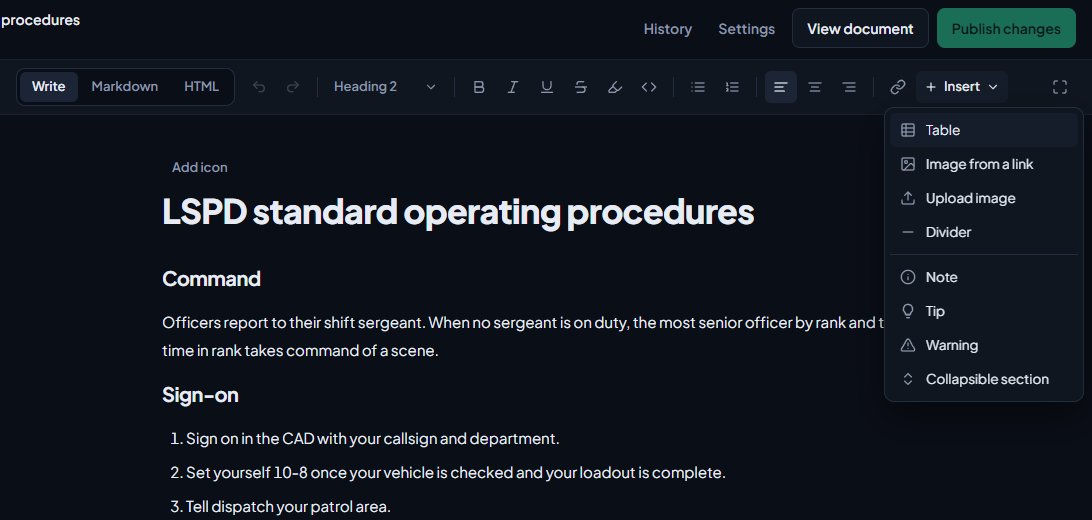
When you're inside a table, a Table menu appears for adding and removing rows and columns. The button at the far right switches to full width.
You can also write in Markdown or HTML with the tabs at the left of the toolbar, and switch back to Write at any time.
Uploaded images can be JPG, PNG, GIF or WebP, up to 5 MB each.
Publish it#
- Click Publish at the top right.
- You'll see Published. Readers now see this version.
Click View document to open it on your community site.
Once a document is published, your edits still save as you go, but readers keep seeing the published version. The banner says This document is live, but your edits are not. Click Publish changes when you're ready for readers to see them.
Choose its settings#
Click Settings at the top to open Document settings:
| Setting | What it does |
|---|---|
| Address | The end of the document's web address, after /documents/. Until a document is first published, this follows the title. |
| Summary | One line shown under the title in the list of documents, up to 300 characters. |
| Department | The department it belongs to. Documents are grouped by department on the site. |
| Category | A heading to group documents under, like Policies or SOPs. Categories you've used before are suggested. |
| Who can read it | Who sees it on the site. See Share a document with departments, ranks or roles. |
Click Save settings. Settings take effect straight away, without publishing.
If you change the address of a published document, links to the old address stop working.
Organise documents into sections#
Documents can sit inside each other, like folders, up to 3 levels deep.
- Drag a document up or down the list to reorder it.
- Drag it onto another document to put it inside.
- Double-click a document to rename it.
- Right-click a document for Rename, Add sub-document, Duplicate, Unpublish and Delete.
On the site, documents inside each other read as one section, with a side menu of the whole section and a Next in this section link at the bottom of each page.
Bring back an older version#
Every time you publish, that version is kept.
- Click History at the top.
- Click a version to see it. The one readers see now is tagged Live.
- Click Restore to draft and confirm.
The old version replaces your draft. The live document doesn't change until you publish again. Documents use the same editor as site pages, so Bring back an older version of a page works the same way.
Unpublish or delete a document#
- To take a document off the site but keep it, click Unpublish in Document settings, or right-click it in the list. Its sub-documents come off the site with it. Publish it again whenever you like.
- To delete it, click Delete document in Document settings and confirm. Any documents inside it move up a level. Deleting can't be undone.
Where members find documents#
Documents are on your community site at /documents. A Documents link is added to your site's menu when you install the module, unless you've removed it. See Change your site's menu.
The Documents page groups documents by department, then by category, with each one's summary, reading time and the date it was last updated. Members also see their department's documents on their My departments page.
Something not working?#
It says "Documents go 3 levels deep at most." You're putting a document deeper than three levels. Move it, or the documents inside it, higher up.
It says "A document can't go inside itself." You dropped a document onto one of its own sub-documents. Drop it somewhere else.
It says "That document is not one you can add to." The document you picked is in a department you can't edit.
It says "Another document uses that address." Every document needs its own address. Change the Address in Document settings.
The top says "Not saved". Your last change didn't reach us, usually because the connection dropped. Keep the page open; it tries again on your next change. Copy anything important before you leave the page.
Members can't see a document I published. Check Who can read it in Document settings. Guests only see documents shared with Everyone, including guests.
See also
Share a document with departments, ranks or roles
Choose who can read each document: everyone, community members, one department, specific ranks (and the ranks above them) or specific panel roles.
Import a Word file, PDF or Google Doc
Bring your existing SOPs and handbooks into Documents from a Word file, a PDF, a shared Google Doc, or an HTML, Markdown or text file, then check and publish them.
Bring back an older version of a page
Every time you publish a page, that version is kept. Look back through a page's history, preview an old version and restore it.
Change your site's menu
Choose the links in your community site's header, put them in order, give them icons, move some into the Links menu and turn one into a button.
Can't find what you need?
Open a ticket in our Discord and someone from the team will help. Found a bug, or missing a feature? Tell us on the feedback board.