Set up unit statuses and 10-codes
Choose the statuses police, fire and EMS units set themselves to, with your own 10-codes, colours and status-check timers, and learn what each status meaning does.
Unit statuses are what units set themselves to on duty, like 10-8 In service or 10-97 On scene. Each status has a code, a label, a colour for the board, and a meaning that tells the CAD what the unit is actually doing. Law enforcement, fire and EMS each have their own list, so police can use 10-codes while fire uses plain words.
Your CAD starts with a set for each. You can change them to match your community's radio codes.
Before you start#
You need the Set up the CAD: call types, statuses, penal code, designs and AOP permission.
Open the statuses#
- Open your control panel and click CAD settings in the sidebar.
- Click Dispatch along the top, then Unit statuses.
- Pick the list you want to change: Law enforcement, Fire or EMS.
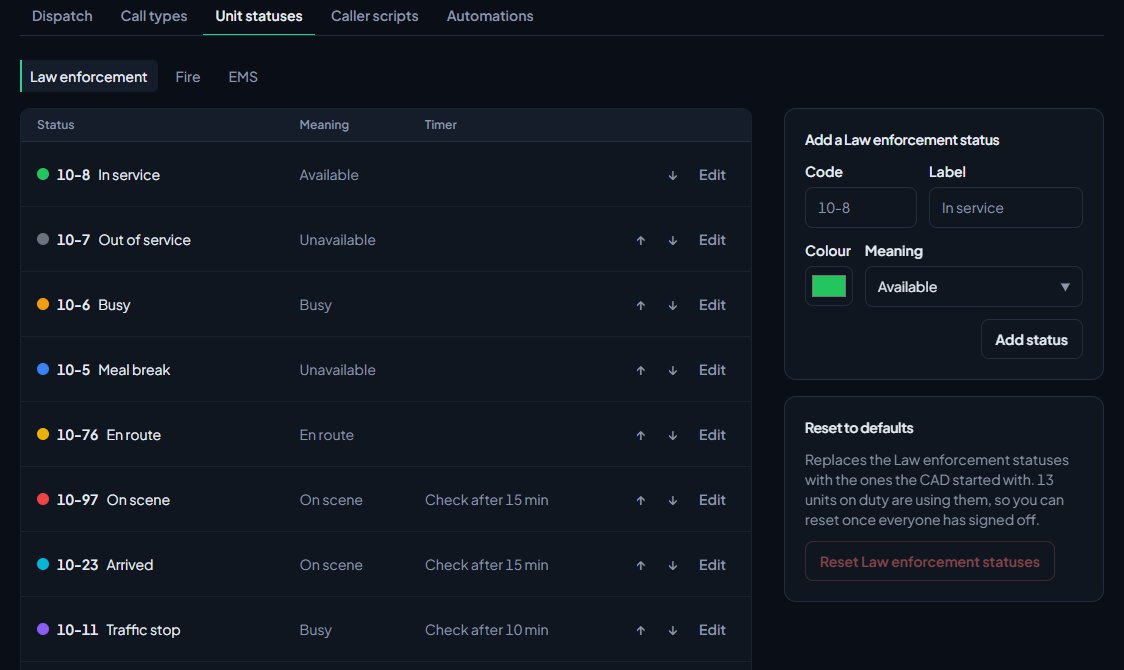
The starter statuses are added the first time you open this page or the CAD.
What the meaning does#
The code and label are just names. The Meaning is what the CAD acts on.
| Meaning | What it tells the CAD |
|---|---|
| Available | The unit is free and can be sent to calls. |
| Busy | Working, but not on a dispatched call. |
| En route | On the way to a call. |
| On scene | Arrived at the call. |
| Unavailable | Out of service, on a break or otherwise not taking calls. |
Meanings also decide how response times are counted on the supervisor stats.
Each list needs at least one status with the meaning Available, because units need one to go in service. The CAD won't let you delete or change the last one.
Add a status#
- In the box on the right, for example Add a Law enforcement status, type the Code, like 10-8. It can be up to 16 characters.
- Type the Label, like In service.
- Pick a Colour. This is the colour the unit shows in on the board.
- Pick the Meaning.
- Click Add status.
Codes have to be different within each list. Law enforcement and fire can both have a status called OOS, but law enforcement can't have two.
Edit a status and add a status-check timer#
- Click Edit next to the status.
- Change the Code, Label, Colour or Meaning.
- To add a timer, type a number of minutes in Status check after, from 1 to 240. Leave it blank for no timer.
- Click Save changes.
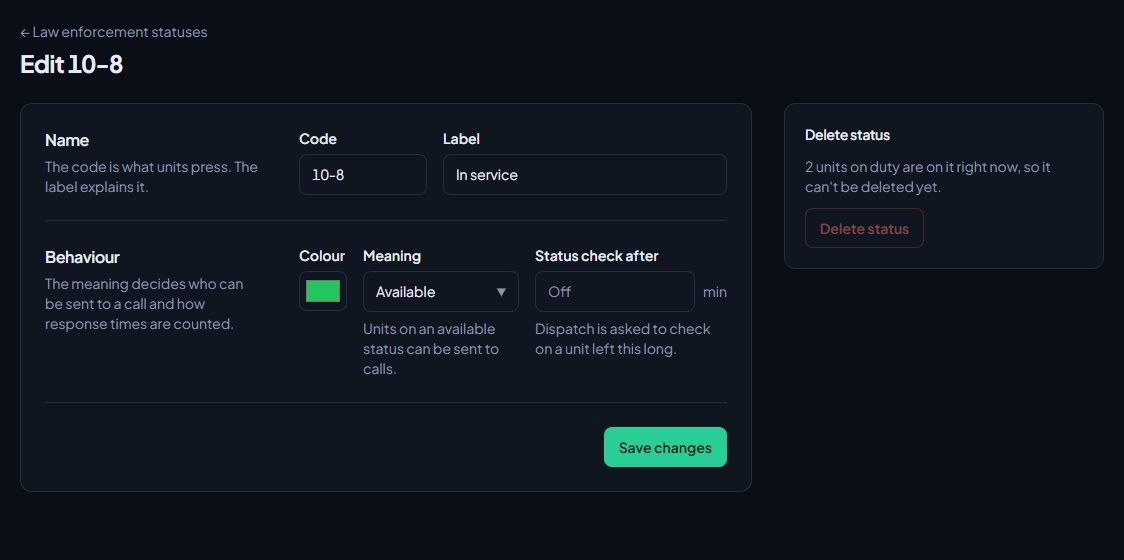
When a unit stays on a status with a timer for that long, dispatch is asked to check on them. This only works while Status-check timers is switched on under Dispatch settings. See Turn CAD features on and off.
Change the order#
Use the up and down arrows. The order matters in two places:
- Units see their statuses in this order.
- When units sign on, they're put on the first status with the right meaning. With the default setting that's the first Unavailable status. If you've set units to start in service, it's the first Available one. You choose which on the Dispatch settings page, under Units start as.
The keyboard shortcuts Status 1 to Status 9 (Alt+1 to Alt+9 unless you've changed them) set the first nine statuses on the list, in this order.
Delete a status#
- Click Edit next to the status.
- Click Delete status and confirm.
You can't delete a status while a unit on duty is using it. Wait until they change status or sign off.
Reset to the starter set#
The Reset to defaults box replaces the whole list you're looking at with the statuses the CAD started with. It only works once every unit using that list has signed off.
| Law enforcement | Fire | EMS |
|---|---|---|
| 10-8 In service | AVAIL Available | AVAIL Available |
| 10-7 Out of service | DISP Dispatched | ENRT En route |
| 10-6 Busy | ENRT En route | ONSCN On scene |
| 10-5 Meal break | ONSCN On scene | TRANS Transporting |
| 10-76 En route | UC Under control | ATHOSP At hospital |
| 10-97 On scene | OOS Out of service | OOS Out of service |
| 10-23 Arrived | ||
| 10-11 Traffic stop | ||
| 10-15 Prisoner in custody | ||
| 10-95 Prisoner transport |
Some starter statuses come with a timer, for example 10-11 Traffic stop checks after 10 minutes and EMS At hospital after 30.
Import statuses from a spreadsheet#
Click Import CSV at the top of the page. Your sheet needs a code and a label, and can also have the meaning, which list it's for (leo, fire or ems), a colour like #22c55e and a check-in timer. See Import records into the CAD.
Something not working?#
It says "This is the only available status for ... Units need one to sign on, so add another first." You tried to delete or change the meaning of the last Available status. Add another Available status first.
It says something like "1 unit on duty is on 10-97. Try again once they've changed status or signed off." Someone on duty is using that status, so it can't be deleted yet. Wait for them to change status or sign off.
The Reset button is greyed out. Units are on duty using that list. Reset it once everyone has signed off.
It says "Another status already uses that code." That list already has a status with the same code. Pick a different code, or edit the existing one.
Units start on the wrong status when they sign on. Move the status you want to the top of its meaning, or change Units start as on the Dispatch settings page.
See also
Set up the CAD for your community
Install the CAD, set up the departments that sign on to it, give your staff access, and work through the CAD settings in the order that gets you running fastest.
Add your own call types
Set up the call types dispatchers and units pick from, with an optional code and a starting priority. Rename the starter set, add your own, change the order and delete what you don't use.
Turn CAD features on and off
Switch off the parts of the CAD your community doesn't use, from the DMV and courts to ride-alongs and Signal 100, and set the options that go with them, like quiet call closing, warrant approval and alert tones.
Go on duty in the CAD
Sign on with your department and callsign, skip the panel screen with a default, go off duty, and fix the messages that stop you signing on.
Can't find what you need?
Open a ticket in our Discord and someone from the team will help. Found a bug, or missing a feature? Tell us on the feedback board.